| Slide rules HOME page | INSTRUCTIONS | A-to-Z |
Addiators
History
The invention of the addiator is credited to J. L. Troncet of France in 1889. It was called the Arithmographe and you can see a picture here. However his work was based on much earlier designs starting with Claude Perrot (1613 - 1688), Caze (1720) and Thomas de Colmar (1820). One problem with Caze's machine was that there was no possibility to "carry one". This was remedied by the development of Kummer (1847).
What is clear from the picture of Troncet's Arithmographe is that the technique of moving the stylus up to and around the top, to "carry one" when the sum of two digits was greater than one, was already present in that machine.
Construction
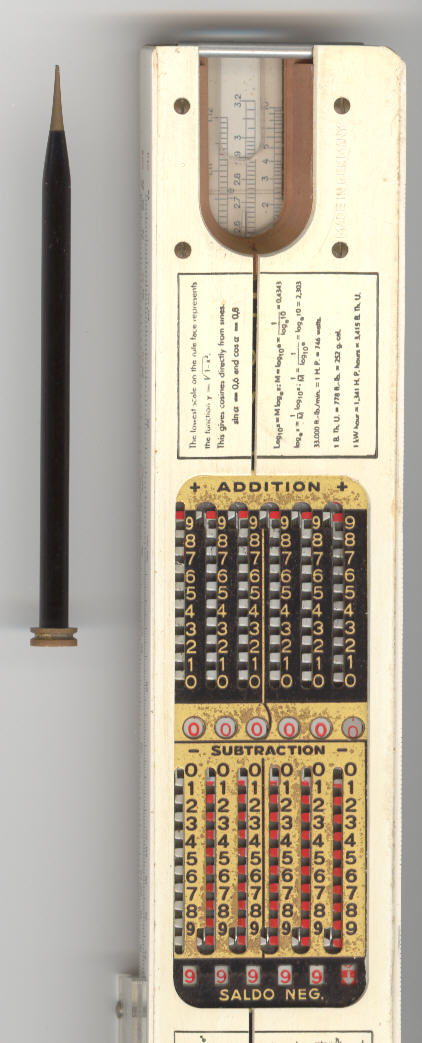
The addiator has three components. The part used for calculation, a stylus and and a handle to reset addiator. The calculations are performed by inserting the tip of the stylus in notches in the metal plates in the addiator.
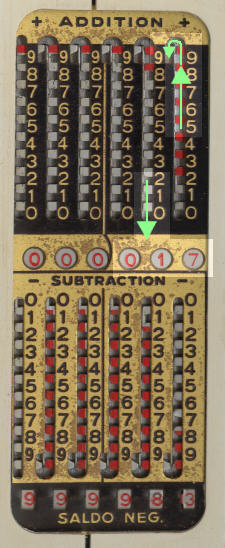
The addiator consists of a single metal plate with numbers on it and spaces through which 6 notched metal strips can be seen. In the middle of the metal plate and at the lower end are two sets of 6 holes through which the numbers on the metal strips be seen. These are referred to as registers; the upper (i.e. middle) one is for positive values and the lower one is for negative values. The upper part of the addiator is used for addition and the lower part for subtraction. Sometimes an arrow appears in one of the registers - this indicates that the answer is in the other register. Calculations are performed on one column of figures (i.e. metal strip) at a time. The right hand column representing the 1s, the second from right the 10s and so on. It is of course possible to use different representations and the two right hand columns could represent the pence and the other four strips the pounds.
Moving the strips downward using the point of the stylus performs addition and moving them upward performs subtraction. Where the result of adding two digits is less than 10, or the result of subtracting one digit from another is greater than zero, this is straightforward. For addition, where this is not the case, the calculator subtracts the 10s complement (i.e. 10 minus the second addend) from the first addend and adds 1 to the next column to the left. This means moving the stylus upward, to subtract the 10s complement, and around the top and downward, to add a digit the next column to the left.
For example consider 7 + 6. The total is clearly greater than ten. This in the addiator is considered as 7, the first addend, - (10-6), subtracting the 10s complement, +10, adding 1 to the 10s column.
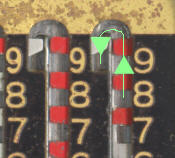
This is shown on the following close-up of part of the addiator. The notches in the metal strips, which are coloured white or red, can be seen below the metal plate with the numbers on. The clever bit, shown by the green line and arrows, is that adding two digits whose total is greater than ten is done by sliding the stylus to the top of its range and around the bend at the top, 1 is automatically added to the next column. The metal plate is so arranged that only 1 can be added by this method. If the number you wish to add or subtract is beside the white portion of a metal strip the stylus moves toward the middle register; if the number is opposite a red portion of a strip the cursor is moved away from the middle register.
Instructions - Addition
Let us consider a simple addition such as 17 + 25. In this case the right hand column is thought of as units, the second from the right as tens and so on.
Put the point of the stylus in the "10" notch and draw it down to the middle. Put the point of the stylus in the "7" and draw that to the middle. The register should look like it does in the picture marked "17 set using stylus". In general how you proceed next depends on the colour of the back strip against the digit of the number you want to add. If it is white, then the cursor is drawn toward the middle register, if it is red, then it drawn away from the middle up to and around the top. This applies both for addition and, we will see later, for subtraction.
Since the "20" notch is against the white part of the back plate, then put the point of the stylus next to the "20" notch and draw it toward the centre. The register should look like the picture headed "Register after 20 added". Since the "5" notch is next to the red part of the back plate, put the stylus in that notch and draw it up away from the middle as far as it will go then around the curve and toward the middle again. (This sounds complicated but is actually quite straightforward when working an addiator.) As can be seen on the detailed picture above, the top plate only allows you to move back to the centre enough to increment the 10s column by one digit. The answer, 42, can now be seen on the register.
17 set using stylus |
Register after 20 added |
Register after 7 added |
After the calculation pull the handle out to reset the addiator.
Instructions - Subtraction
Let us consider 352 - 1071.
The first setting shows the settings after 352 has been entered in the upper part of the addiator and1000 (i.e. 4th column from the right) in the lower part of the addiator. There are two important things to notice. First there is a downward pointing arrow in the upper answer, showing that the answer is in the lower register. Secondly the value in the lower register is -648, that is 352 -1000.
To complete the calculation the following steps are necessary.
1. Do nothing in the hundreds column (since it is zero in 1071).
2. Insert the stylus in the notch opposite 7 and, since it is in the red part of the
strip, move the stylus down to the bottom, around and up to the stop.
3. Insert the stylus in the notch opposite 1 and, since it is in the white part of the
strip, move the stylus up as far as it will go.
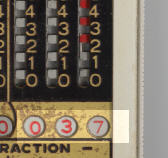
The answer, -719, is shown in the lower register.
Slide after setting 352 and -1000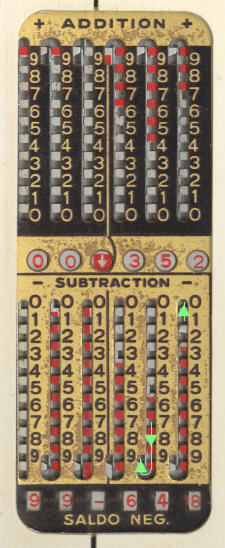 |
Final result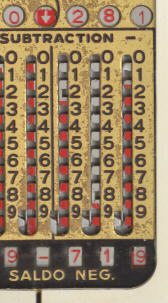 |
Resetting the addiator
It is important to reset the addiator before performing any calculation. If it has been reset correctly then a row of zeros will appear in the middle register.
Under certain circumstances, for example if the answer is negative, simply pulling the handle out will not reset the addiator. In this case use the stylus to move any columns which do not have a zero downwards.
Do not force the addiator. If the stylus seems to stop prematurely this could be because you are moving in the wrong direction. In this case leave the tip in the notch and move it in the correct direction.